Friday 29 April 2011

Laughter

I wish we only need to report for work and go to school on a 4-day week. That means an extended weekend, more family time and more scrappin'time! I feel so blessed that in the past few weeks, I was able to scrap more and my mojo just kept on running. I think a lot has to do with having an efficient and responsible helper around now. She is not perfect and has her shortcomings but which one of us is totally perfect? I always remind myself that here in Singapore, we should be thankful that we can employ domestic help, else many of us will be struggling with work, family and caring for kids...I am sure without such help, the country's birth rate will dwindle further...

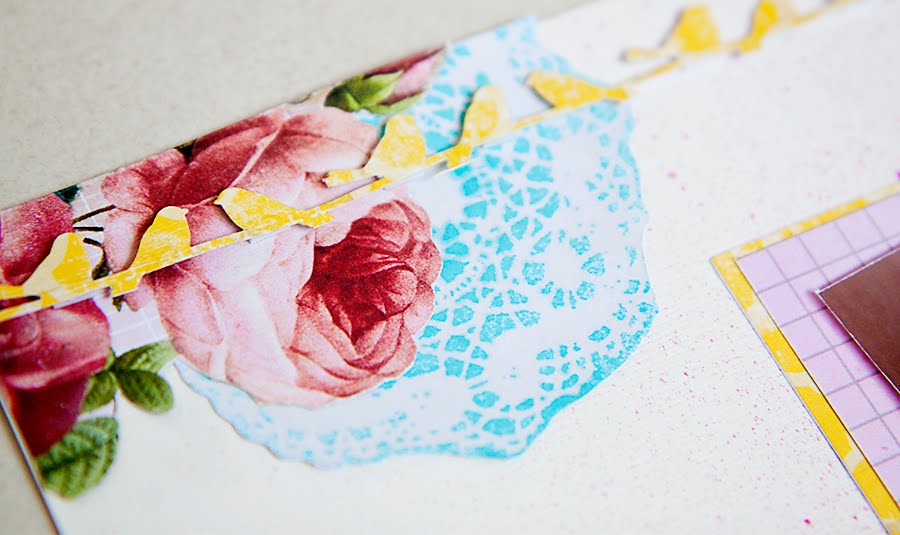
This is another layout that I had completed over the Easter weekend, combining the latest line from Pink Paislee's Daily Junque and some of my leftovers from last year's Sweetness and Old School.


I cut out parts of the paper from Daily Junque and Sweetness, and assembled the parts on the white cardstock which I had misted with Tattered Angels' Viva Pink Glimmer Mist. I just had to add a bit of Prima to my layout, the laces and the sweet beaded vine which I cut up and rearranged it to spread out under the red metal charm, the little rosettes and leaves.


The red metal charm was from last year's School Days collection. I pulled off the epoxy sticker on it and cut out the Daily Junque papers to fit into the space left behind. Then I added the 'Laughter' metal charm from The Girls' Paperie to it. You can see the close-up below.


I punched out the birds resting on the vine and added them together with the flower cut-outs and the doily to the top left. The doily was from Pink Paislee's Parisan Anthology collection. I cut it out and misted it in blue. Love love love that shade!


Once again, thanks for coming by my humble blog. Singapore's going to have her elections soon and we have to cast our votes for our estate. A lot of excitement going on around here! And since Adah's school is goign to be used as a polling center, she is having another short week next week. Yippee!

Sunday 24 April 2011

***Warning*** Long post with lots of pictures.

I took a number of pictures for this little altered project that I have completed over the week. I had lots of fun converting two 20 by 20 cm canvas into a shadow box frame and now it's happily displayed in my living area. I will probably admire it for a while more before I decide to bring it down to MWL for display.Lols!

This is the front of the first canvas board. I painted the canvas boards yellow and added gold mica flakes from Golden at the borders. This was followed by lots of fussy cutting of the papers from Basic Grey's Curio collection, before layering teh cut-outs on to form a garden scene. I also added chipbard stickers, Prima felt gate,a hambly ornate cut-out and the green ribbon from Websters Pages to complete the look.


This is the second canvas and I opted for a similar look as the first. There was also lots of fussy cutting and layering.


Finally, when the two canvas boards were completed, I attached them together using hinges. This is how it looks placed together. I loved how the gold mica flakes caught the sunlight and sparkled under the light when I was taking the pictures. It really adds a different touch to the look.


I then embellished the interior of the 'shadow boxes' now, adding on my favorite Prima laces to the border. I wanted to cover up the staples used to fasten the canvas onto the wood. For the 'shadow box' on the left, I added a family picture from our trip to Australia last October. That was the latest family photo we had. The rest of the time I was usually the photographer!

I added Prima flowers, flocked rub-ons and Say-it-in Crystals Swirls to embellish the photo. Converting that back part of the canvas into a shadow box meant that I had some depth to play with though I had to be mindful that the shadow boxes can still be closed together after all that layering and embellishing.For the 'shadow box' on the right, I cut out a piece of cardstock and converted it into a holder for a mini album that I made.


This is the mini album book that I had made to be stored inside the shadow box. It contains all my favourite pictures from our trip together. It's my first time creating a mini book and I opted to sew it together using a thick piece of felt string. Definitely fun to see the end result! I think I will be exploring other ways to create mini-books soon! I also had to remember to go easy on the embellishing and not create too much 'bulk' as it had to fit into the thickness of the shadow box...

Did you see the lovely Prima bird and birdcage Prima charms that I have tied onto the book? They are prefect for such projects and mixed media work. I have used up my current pack of charms and I will have to check out MWL to stock up. Hopefully there will be a stray pack of two still lying around...fingers crossed...


This is the interior of the canvas boards, converted into shadow boxes, fully assembled! I was so happy after completing this, I could shout for joy!


Some close-ups...


Thursday 21 April 2011

Pink Paislee- Daily Junque / The World is Yours to CREATE

I have been good the past few weeks. I scrapped almost immediately and every new collection that I had bought! I feel less guilt now since the stuff are put to use but I have neglected on practising my photography after the last shoot I did for my girlfriend's baby and I have not been taking pictures of my own kiddos! (Note to self: I MUST take more pictures of Adah and Asher.)

I scrapped this using Pink Paislee's Daily Junque collection. I like this collection. The colors are bright and filled with vintage reminders, the typewriter, the tiny spray of flowers, the banners, the bicycle and the colorful bird. This collection is so versatile for scrapping almost anything, summer pictures, holidays, daily stuff etc. Pink Paislee really outdid themselves again! Then again, I always end up swooning almost every new collection from CHA...Lols!


Just a very simple layout this time with cut-outs mainly from the 12 x 12 journalling diecut sheet. I lined up the banners and added another one from Jenni Bowlin across the top right hand corner to form part of the title. The school badge was from one of Pink Paislee's collection last year- School Days. I had a tough time cutting out the badge from their transparency because it was so thick! Woah..I definitely grew some muscles after that. The cute little bicycle was from Tattered Angels.

Here's some close-up shots.


The little row of rosettes is from Tim Holtz and I brushed on Glimmer Glaze in brown and Pink. I cannot resist adding a little mixed media stuff into my layouts these days. Just some simple efforts but I feel it makes my layout truly mine and personalised.


I brushed on Ranger's Distressed Cackle Paint in clear crystal onto the chipboard bird to get this cracking effect. I liked how it turned out...When using mediums, I usally try to let them dry overnight as I believe natural drying brings out the effects better. Also, I am too lazy to bring out my hot gun or hair dryer. And I like the surprise that awaits me when I wake up in the morning and rush out to check out my layout and run my fingers over these stuff! Such an addiction...tsk tsk tsk...

Sunday 17 April 2011

Using up old stash- My Little Shoebox

I was trying to sort out my stash two weeks ago and wanted to sell or RAK away some items that I used to buy on impulse. Sadly, after two days of taking things out and packing them back in again, I am not much better from where I started with. It does not help that you have a young daughter at home who coos over every piece of paper you are sorting through and keeps telling you to keep that because she can use it for her own scrapbooking and art projects! Wonder where that DNA came from? Lols!

Anyway, I found some papers from My Little Shoebox amongst my paper stash and decided to use them up. So I ended up with a layout, 2 cards and an altered frame from the leftover scraps in a night and I was so so so proud of myself after that! This is the layout that I had created for my girl. She was 6 when the pictures were taken. Everytime I go through the photos to select for scrapping, I can't help thinking where did all the time go to? She just grew overnight from that cranky baby to this young, fiesty lady.


I cut up the die-cut paper to fit into the top corner and also cut out some flowers from another paper to use as embellishments. The photos were matted ontp a journalling card from Prima. How versatile is that! I also used one of the new Prima crystal lace as the border below the photos, together with the rosette ribbon trim from Websters Pages. A close-up of the layered flowers, with Prima flowers, a glittery butterfly from old stash and a new charm from Bo Bunny.


This is the altered frame measuring 4 by 4 inches. I bought the frame from Daiso, a thrift store here, and mixed in some clear granular gel with yellow acrylic paint and painted it onto the frame before sticking on the paper cut-outs. The trees and the clouds were from Maya Road tree chipboards and they were a good fit for the papers too. The wordings were stamped on from an old Unity stamp. I added some stickles onto the birds and tree trunks for some 'bling' and the flower petals were from Prima and had been in my stash forever too!


With the leftover papers, I made two simple cards. Such a high from a scrappy, inspired weekend! Thanks for coming by and have a good week ahead!

Sunday 10 April 2011

Crate Paper

When the Crate Paper collections hit the shelves 2 weeks ago, I rushed down to Made With Love to get them immediately! I had saw the CHA sneaks and was already crazy over the new collections- Emma Shoppe, Toy Story and Potrait. I wanted to get the full collections for all three (yes, everything in them!) but since I had just spent a mini fortune on a new camera lens and flash, I decided I just had to be more selective on my scrapbooking purchases, especially since I am hoping to get another lens at the end of the year.

The chipboard elements for the 3 collections are must-haves and I went through each of the papers carefully to make sure I choose those that I am sure I would use. I got some layered stickers for Emma's Shoppe and Toy Story because they are just too adorable! And of course, everything else from the Potrait Collection. Sometimes, I wonder how I became such a hoarder given that I always like to de-clutter and throw out my other stuff regularly. If a thief breaks into my house, I only have my camera and scrapbooking stuff for him! Lols!

So these are the two layouts that I did using the new collections. The first one, 10 years is from my most favourite of the three collection, Potrait. It's to remember our tenth year anniversary of registering our marriage in November this year. We hardly have any pictures of us together and after the kids came along, we only wanted to snap away at them. We managed to get a few couple shots taken by a lady photographer in Shanghai before we left and finally I have a chance to scrap some couple photos instead of the kids.


For the second layout, using the Toy Story Collection, I scrapped photos of Asher at 10 months old. I brought him to a studio to have some shots taken and they provided this cute soldier romper for him to wear. I painted the background with some gesso to draw emphasis to the photo. I also used a border punch on the yellow cardstock but purposely painted some gesso over it for a rugged look when part of the border broke due to my inexperience with handling the punch!

Part of the fun in scrapping for me is to finding ways to correct the mistakes made here and there. I always share with my classes that only when there are mistakes, then it feels truly handmade! Lols, my own crazy set of thinking!

I am hoping to get a bit more scrapping done since it's pouring now and it doesn't look like we can get out of the house to the playground anytime soon. Have a great week ahead!


Monday 4 April 2011

Made With Love DT Crop- Maya Road Apple Chipboard Album

I went for a DT Crop at Made With Love yesterday. We were supposed to come up with projects for display around the store and I chose this apple shaped chipboard album. There were butterflies and strawberries and trees albums for us to choose from but out of convenience. Lol! I didn't want to be cutting odd edges of papers for the album and this was the easiest shape I could find.

It was fun chatting with the other ladies, eating and laughing as we worked away. Actually, I hardly ate as I was sneezing away as I cut. The sneezing started since I was at church in the morning and I was focusing on trying to complete as much as I could in the 2.5 hours that I had for the crop, as I was rushing off to do another newborn shoot for my girlfriend. I misted the tops of all the apples on both sides and then cut out heart shaped papers to fit the rest of the chipboard. The rest was just layering and embellishing.

I am so humbled as I saw the other ladies at work. Aida painted and glittered her album cover and it was a pretty, shiny surface. Swee Ching took pains to cut precisely and sand every one of the romper chipboard she had chosen. Wendy was painting and sewing away. Pooi and Piradee were so focused and completed their projects the fastest in their usual styles, Pooi with her cheery and layered look and Piradee with her classic and elegant look. And Esther had such a beautiful bird banner! Sometimes, I am so envious of their talents and wish I could come up with such creativity too!

Well, I didn't finish up in time and had to rush off but I packed back some embellishments and finished the rest in the night...just lots of cutting and pasting and adding stickles here and there. Wonder what kind of style is mine? Thanks for popping by. Do leave a comment so that I can also visit your blogs and learn from you too!

Mist, Misting & Mistables!

For my assignment scheduled at Made With Love this week, I was assigned to use Mists on my project. Mists are one of my favourite mediums to 'spruce' up a plain layout immediately. They add color and with different techniques, you can achieve a variety of looks, blotchy patches, droplets, big blobs etc. I was also itching to use the Prima mistables after I had bought them for some time when the Prima stuff just flooded the shelves a few weeks ago, so this is it! I misted on the Pink Paislee- House of Three paper with various ink colors, before layering with the rest of the stuff. I used a layer paper from Glitz Design and attached a lace around die-cut from Prima's Madeline paper line. I also cut out part of the Prima packaging from the Prima Mistables and attached it down. Then I started to mist on the flower, leaves and swirl cut-out from the mistables sheet. When the cut-outs were dry, I was pleasantly surprised at the how the cut-outs rolled up. Wow! That gave texture and dimension immediately! I cut out the flowers and rolled it up such that it looked 3-dimensional and folded the petals back to 'open' it up. After which, I used Tattered Angels Glimmer Glaze to outline the flower petals and draw on the swirl.
I added Prima flower centers to the middle of the two smaller flowers and as the larger flower also had a deeper hollow, I dripped Glossy Accents into the hollow and filled it up with beads before finally adding a crystal stick-on. Love the final outcome after all that experimenting! I also added a doily that I had cut-out and misted from another Pink Paislee- House of Three Parisan Anthology paper and inserted it below the flowers. The wooden butterflies were from Studio Calico which I had tried misting with before and they really take on the colors well, but I decided not to mist them in the end for this layout as I preferred a 'naked' feel and decided to add some crystals on it. A side profile of the layout...now I am wondering how to store this layout. But I guess that would have to wait as the layout is down at the store for display.

Saturday 2 April 2011

Call me Buzz Lightyear

Honestly, I never paid much attention to BoBunny's products until they came up with the Gabrielle collection which I had used for my first class at Made with Love. But I was very impressed with their recent CHA collections and couldn't resist getting this cute 'Blast off' line as I wanted to record Asher's obsession with the Buzz Lightyear character from Toy Story.

Lots of fussy cutting from this line and layering, and I was happy that I was starting to use more 'cute prints' patterned paper than those floral, vintage papers. I used to buy bright, cheery papers like these before but after I had accumulated too much stash, I decided to cut down and be selective with my purchases but I miss doing these kind of layouts too! Sometimes, I get tired of seeing the same style on my layouts and I will switch around for a while to get renewed mojo. I hope you like what you see here.

Enjoy the rest of your weekend!